Showing posts with label October MM Paper Kit. Show all posts

Sundays with Sandee + Frosted Designs Kits = A Brand New Journal!

Friday, April 18, 2014

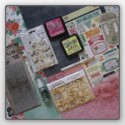
Hello everyone! Barb here to host the blog today! I don't know about you, but I absolutely love our Sundays with Sandee series! The woman never runs out of ideas and I LEARN sooooo much from her! I may not have time to try out every single thing, every single week but I am watching and learning! So… when it was time for me to make a journal, I decided to go review a few lessons and put them to practice! You are actually going to laugh when you see how many I used!! The other thing I used a lot of were the Frosted Designs Kits! I pulled a little out of this one, and a little out of that one, and then something from another one… you get the picture!! Isn't that the best part of getting kits?!

I like to have a little notebook that I take with me to church. This is my place to keep any sermon notes, bible verses or any other important words of wisdom so that I have them all in one place. Once I am home, I can look back over my sermon notes and also use it during my devotion time. That is what this little notebook is being used for.

So, here it is! The completed journal cover! I have to confess, this is my second attempt. The first one just wasn't working for me so I started a second one. My only regret on this one is that I didn't take photos each step of the way so you could see the madness to my thinking!! :)


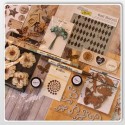
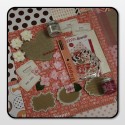
I started with the Mixed Media Journal in the Frosted Designs Store. I love that it is wire bound and has plenty of pages! The size is perfect for fitting into my purse. I used the graph looking paper that was in the "Love is in the Air" Kit (Clean Fun) and cut it to the size of my journal cover. I did all of my work on the paper before I adhered it to the journal. That way I didn't have to worry about mists and paints getting on the journal where I didn't want it.


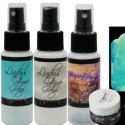
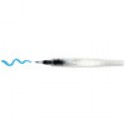
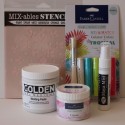
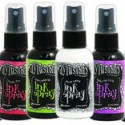
I started by creating the background using Lindy's Starburst Sprays & Sandee's Lesson #3 - Wax on or Wax off! I loved the way it created the soft blue background! But that was not enough! So, the next lesson I used was Lesson #4 - Going Dotty! I added dots with the Lindy's Starburst (using the dauber top), and stencils (from the November Mixed Media Kit & Shades of Spring Kit.) I also used the Tim Holtz Distress Paint Dauber (Juniper) in the Shades of Spring Kit! The stem of the flower was painted using the Lindy's Magicals that come in our current kit, Beauty of Nature. The Koi water brush was perfect for this!


My next step was to check out Sandee's Lesson #6 - Acrylic Pour and Ink Blots. I didn't actually pour the paint (other than a few splatters) but I liked the way Sandee used the Patterned Paper for her heart. As I was sitting there struggling to figure out what I wanted on the front of my journal (didn't want a cross or a heart) I decided to check out Lesson #8 - Mixing it up! The flower that Sandee had in that lesson inspired me to make the flower but I used patterned paper for mine. The red paper came from the Love is in the Air Kit. I cut out 3 hearts and layered them over each other. I then punched a circle from some paper in the Shades of Spring Kit. I folded the circle in half and used it to hold the "petals" of the flower together! I used the Black Gelly Roll Pen to outline everything.


Next it was time for the title. Everything in me wanted to grab some nice thick stickers to stick on and call it done… but I didn't! Instead, I added a title with the Black Gelly Roll pen and I hated it! It wasn't the handwriting that bothered me as much as it just got lost on the page! So… I grabbed the November Mixed Media Kit and cut out the Journal tag. It was the perfect size to cover up the title I didn't like! :) I then jumped into the next Sandee lesson, #23 - Bar Lettering. I added a few lines on each letter using the Tim Holtz Distress Marker that comes in the Beauty of Nature kit. Inspired by Sandee's Lesson #10 - Cut it Out, I cut the word "take" from the patterned papers in the October Mixed Media Kit. The sticker under the title came from that kit as well. The striped tape under "take" is from the Season of Stars Kit. I seriously love that tape… it ends up on many of my projects!

To finish off the cover, I added my favorite Bible verse in my own handwriting. Finally, I adhered the paper to the front of my journal and I was done! I am happy with the way the journal turned out and I am even more happy that I ventured outside my comfort zone to create it. That is also one of the things I am enjoying with the Frosted Designs kits… trying out all kinds of mixed media items and techniques! I am so thankful for all of the Sundays with Sandee Lessons that were available for me to learn from and the nudging from Lori (Telling Your Story Through Scrapbooking) to add handwriting to all of our projects!

I'm sorry my post was so long today but I hope it inspires other to get outside their box to try something new! I would love to see what you make! You can share it in our Facebook Group…. there are a lot of amazing ladies who hang out there and are super supportive! Have a great weekend!

*Did you know that you can get one of our 2013 kits for FREE when you sign up for a subscription! Just leave a note a checkout stating which kit you would like! If you have questions, send an email to barb@frosted-designs.com!


7 Comments »

Art Journaling Phobia!

Wednesday, November 13, 2013


I'm not sure that is the official term (Art Journaling Phobia) but that is what I am calling it!!  :)  Let me start from the beginning.... when we first decided to open the Frosted Designs Store, I knew that I wanted to provide all of you with a Mixed Media Paper Kit. I didn't want a kit that had random mixed media items added to it that I wouldn't have a clue how to use. I wanted a kit that combined my love of paper crafting with the new Mixed Media trends. I admire all of the mixed media items that everyone is using on their cards and layouts and art journals but I didn't have a clue how to add them to my projects. So, the goal of the Mixed Media Paper kits is to not only inspire, but to educate as well!


Now, that leads me to the project I am sharing with you today. I have been following along with Sandee when she does her Sunday with Sandee Series. (If you have missed these, you are missing out! Click HERE to get caught up!) I casually mentioned to her how terrified I was of Art Journaling. I mean, I LOVE to look at art journaling but there is NO WAY I could ever do that! Sandee has sweetly nudged me to give it a try and after her tutorial on wax paper last Sunday, I knew I was going to have to try it! (After all, she does make it look so easy!) So, the journey for me begins!

When I told Sandee that I actually opened the journal for the first time (yes, I was that scared to start!) she asked me if it bit me. (Gotta love a girl with a sense of humor!) And good news, I had my journal open and was unharmed! I thought to myself... I can do this! And I did!!! Slowly I started to build my page and here is what I created....

I have to say.... not only was the process not miserable, but I actually had a lot of fun with it once I got started!! I might even to so far as to say, I enjoyed it and I will probably do another page (or two!)  Like all new things, I learned a lot. There are things I am really happy with and then there are things I am not so thrilled with. But the good news is, I am looking at this as a learning process, so reflecting on what worked and what didn't is part of that process!

One of the things I did that I really liked was the way I used Gesso to tone down the inks toward the center of the flower. I literally stuck my finger in the Gesso and lightly smeared it around the center of the flower and part way up between the petals. I also like the way my doodling on the flower turned out.

Another thing I was really pleased with was the overall background. I love the way some of the ink smeared together and in other places, the spots are more distinct. I also combined a Spray ink that had some shimmer to it with the Dylusions Spray Inks that have bold colors but no shimmer. To create the dots, I brushed some bubble wrap with gesso and stamped them on the background.

One of the things I wasn't happy about was the butterfly. I drew a butterfly on the page but didn't like it so I went through the October Mixed Media Paper Kit to find one of the Maya Road Die Cut Butterflies. I liked this one better so I traced over the other butterfly (yep... totally cheated!) Since I needed to cover up the old butterfly, I decided to paint the butterfly with the DecoArts Paint that was in the kit as well. Once it was dry I added some black outlines and a few pink dots to the wings. I don't love it but for now, it is staying put.

When Debbie shared her project for the October Mixed Media Kit, she pointed out how she used paint to highlight some of the words on the paper. I loved this idea and used it for my flower. (By the way, the paper is from BoBunny and was in the same kit.)

After I got the background done and added the flower to the top, I sent Sandee a photo and said "now what?!" She sweetly told me to find a quote that spoke to me to add to my page. And since I was terrified to start this art journal journey, this quote really summed it up for me! I actually conquered two fears today... I also used my own handwriting to do the journaling. I usually don't like to do that but I decided to give it a go! And the good news is, (in my opinion) it's not horrible!  :)

Now that I have shared my page with you, we would love it if you would share your pages with us! We have had a few of you share them on our FB page and we are loving it! Keep them coming! Click HERE to find our FB page. 

I used items from the October Mixed Media Paper Kit. I also used the Gesso from the Mixed Media Starter kit. (If you are just getting started with Mixed Media, this is the kit for you!)


We still have a few of the October Mixed Media Paper kits in the store. And, in TWO days we will be releasing the November Mixed Media Paper Kit. And a reminder.... if you purchase a 3 month or 6 month subscription to the Mixed Media Paper Kit, we will send you a free Ranger Dylusions Creative Journal (which has a $24.99 retail price). You can start your subscription with the October Mixed Media Paper Kit or the November Mixed Media Paper Kit. Just keep in mind that this offer expires on Nov. 30th.


Would you like another sneak peek of the November Mixed Media Paper Kit?! Well here you go....


10 Comments »

Mixed Media Tutorial - Adding Texture with Paint and Mesh Ribbon

Monday, October 21, 2013


Hi everyone, it's Anita here today and I have a a project and a tutorial
to share with you using the fabulous

Have you bought one of these for yourself yet??
What are you waiting on? They are awesome!

Here is a look at my layout
Everything here is from the kit, except for the cardstock. 
I like to add fun texture to my background papers and a great
way to do that without adding a lot of bulk to your page is to use paint.

I mixed the cream and blue paint in the kit on my craft mat.
Now, this can get a little messy. I cut a piece of the mesh, and stuck it in the paint.
Then I used the same craft stick I mixed the paint with to rub the mesh into the paint and
make sure that it was loaded. I am not too worried about getting all of it covered.

 I use my tweezers to move the mesh to my paper, then I place 
a piece of scrap paper on top of the mesh and press down. The scrap paper will 
allow you to get a good transfer without
1. getting it all over your hands
2. smearing the paint all over the paper
Pick up the scrap paper, then pick up the mesh and repeat. 
USE A NEW PIECE OF SCRAP PAPER FOR EACH IMPRESSION.
or you will get paint from previous transfers. 

Here is what my background ended up looking like
Set aside to dry for just a few minutes and you are ready to go!

I inked some of the buttons from the kit, tied floss through them and
used them as a banner. All the other paper elements were fussy cut from
the papers.
I absolutely adore this ribbon that was in the kit! 

Thanks so much for stopping by today and I hope that you
give this technique a try. It is messy, but fun!

Anita

7 Comments »

Playing with Paint Splatters!

Saturday, October 19, 2013

Hi everyone, it's Sandee with a short and fun tutorial on playing with the Deco Arts paint pots and the BoBunny paper that you will get in your October Mixed Media Kit.


My finished cards:

#1 Adding paint splatters using a foam brush and a stipple brush.

#2 Adding paint splatters to wet watercolor paper.

#3 Using the pre-existing paint splatters from the pattern paper
 and creating doodles with paint around the edges.

I hope you enjoyed "Playing with Paint".


7 Comments »

October Mixed Media Paper Kit Layout

Friday, October 18, 2013

Hi everyone, it's Anita here and today it is my turn to share a little bit about me
Well,, I am a paper addict.
I love to garden.
I am a clean freak - I vacuum my ceilings. 
I am a sucker for a stray cat!
I am an avid baker and made custom wedding cakes for 15 years
and oh
I have a Masters Degree in Aeronautical Engineering. :o)
Yes, I am the proverbial Rocket Scientist.

Today I want to talk about the fabulous 
I was so happy to be able to play with it!!

How yummy is this kit??? You really will want one for yourself!

Here is the first project I made with mine.
Yes, my DD1 is the queen of selfies, she took them before
anyone even knew what they were!!

I used the stencil and the cream paint from the kit to make
my background.

I love all these elements and how they all came together.
For a little color on my wooden button, I added a little bit of ink and
tied the black floss that was in the kit into a bow.

Thanks so much for stopping by today!
Be sure to order a kit for yourself- you will love it!
Anita

3 Comments »