Showing posts with label Summer's End. Show all posts

Find Your Scrapping Mojo with Joni!

Tuesday, December 30, 2014

Joni Parker here today wishing you a Happy New Year!!

Ever seem to just lose your mojo?  You know, your creative juices just don't seem to be flowing?  I know that happens to me sometimes, so I have a few fun ways to give myself a little jump start and I thought I'd share with you today.

  1. I turn to challenges or sketches to see if I can get an idea going.
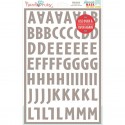
  2. I have a "list" (partially shown below) and I pick a few random numbers from each column (without looking) -- I then "try" to go along those paths, but I also don't force myself to use one of the options if it just doesn't fit.  I like this idea because sometimes it reminds me of things that I might forget to use otherwise (like cork or doing a monochromatic layout)
  3. I also let my 11 year old son "pick" stuff for me.  He loves that, and loves to walk around my scrap room and try to find items or "drawers/bins" to challenge his mommy.  Sometimes he'll even pick a theme for me from column 3 on that list I mentioned above.  He enjoys seeing how I used all the items he picked out for me.
Column One is "stuff", Column Two is "Manufacturers", Column Three is "Design or Topic"...but as I kept going, the list got all mixed up...whatever.


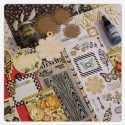
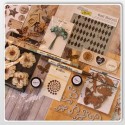
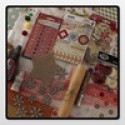
So, this layout is one of those times....I was stuck.  One of my best scrappin' buddies has a favorite challenge...Pick 3 random pieces of paper (without looking) and use them together.  I had my son pick the papers for me and then I turned to my list for other inspiration.  
In addition to the random papers I ended up with this list: a small photo, a frame, "My Clip-it-up" (which is a carousel that houses misc embellishments), Banners/Pennants, Rulers, Cork and Metal.  Sounds like a lot, but remember, I know I can take "off" something if it doesn't seem to work. 

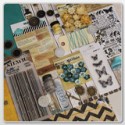
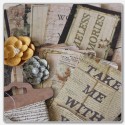
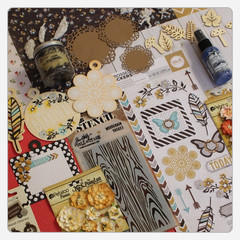
I went to work with my papers and photo first, getting a basic design down.  Then I grabbed several of my Frosted Design kits and found some of the embellishments and a lot more than even my list.


So, hope that you can find your mojo when you seem to lose it.  I also will sometimes go to Pinterest or Magazines to get a little inspiration!!

Hope you have a great 2015!!

Also used but not pictured below:  Rustic Beauty Kit & Fancy Pants Nautical Tickets


4 Comments »

Unique with Brenshevia!

Monday, October 20, 2014

Hey, hey all it's Brenshevia once again sharing my latest Frosted Designs creation with you.  For this project I used our August Summer's End Kit.  It has such great colors for the Fall.  If you havent grabbed yours yet please do so before they run out!


That's all for now, thanks for stopping by!


You can find the Summer's End Kit in the Frosted Designs store HERE! 


4 Comments »

The Deconstructed Layout with Anita!

Wednesday, September 3, 2014

Hi everyone, it's Anita here today and  I have another installment in my Deconstructed Layout series to share with you

For my project I am using the fabulous Summer's End kit from Frosted Designs
 

Today's Deconstructed Layout is about using repeating patterns and colors. I really wanted my photo on this layout to stand out, but I still wanted to be able to use a fair amount of detail and embellishments on the page. 
In order to do this, I kept the colors to a minimum and repeated the same shapes over and over. 


Here's a look at my layout
My goal was to have lots of detail on the page, but make it blend into the background and let the photo shine in front. 
To make this happen, I 
1. repeated the same basic shape of the KRAFT DOILY from the kit several times.
*doilies
*stenciled background
*brads
*flowers
2. I REPEATED the pattern of the KRAFT DOILY on the edge of my punched strip
3. I picked a color from the photo (Golden Yellow)and went several shades lighter for the color of my embellishments/background

The Petaloo flowers included in the Summer's End kit were perfect, and I used a  We R paper from the kit to mat my photo.The Gold dots are from the December Mixed Media Kit, and the metal piece is from the Summer's End. 


This is the same cardstock I used to mat my photo with, I punched both edges and added a strip of glitter down the center. The die cut stickers is also included in the Summer's End kit.


On the kraft doily I inked the edges and added some faux stitching- and I cut them in half before I tucked them under the photo mat. Now, I still have 3 to use again on another project. I stamped here with Elle's Studio stamps and the brad is from the Capture the Moment's kit. 


I loved the resin accents from the kit, so to make them blend in I used the same ink on them as I used else where and buffed with a dry cloth. I added some ribbon and more pearls here. 


Thanks so much for stopping by today. 
I hope you have enjoyed this installment of my Deconstructed Layout series! 


4 Comments »

Life Documented with Connie!

Thursday, August 28, 2014

Hi everyone. It's me Connie and I am hosting the blog today.  I created a page with a picture of my Daughter and her Boyfriend in their Prom attire.  I had ordered about 200 photo's online and they did not arrive.  I was getting ready to print a couple at home and place another order at the store when this box arrived. A gentleman had my photo's in with his order and when he looked at them he knew they would be missed and he mailed them to me.  I am very grateful and lucky.

Here is the page
I mixed the Summer's end and the Enchanted kits.


Here is a close up
I made rolled roses with the pattern papers


I added a sticker for the title


I cut the doily in the kit in half and added flowers from the End of Summer kit.


Products found in the Frosted Design Store


6 Comments »

Life is Beautiful with Cynthia!

Tuesday, August 26, 2014

 Hi  all my friends from FD !!!!

Today I am so excited to share my page using  this month's kit; "Summer's End." 
This kit is  gorgeous, so many wonderful papers and all the embellishments are gorgeous !!!!
I hope you enjoy my page and see so many details for you to use on your own page!!!
Create with love that´s it!!!
Hugs from BraziL


                                                   Life is Beautiful!!!!!!


              Life is Beautiful!!!!!!
STEP 1 
I started thinking about the topic of this page when I saw the beautiful colors of this collection of papers this month !!! 
I love the shades of blue, brown and beige with and decided to make handmade flowers that matched with the leaves of this collection. 
I love to wear lots of layers on all my pages and therefore use cardboard, gauze and papers from the same collection that match all shades of roles.


STEP 2


To start the first layer, I used cardboard and gauze which gives an air of lightness to my page. 
I love putting many papers from the same collection to form layers


STEP 3


I adore flowers for me are the most beautiful details of a page and delights me to make them. 
I made flowers in shades of blue and brown and some lighter to contrast with the leaves, I also used Petaloo flowers they are wonderful 
I made a yellow flower to contrast with the shades of blue which gave a very beautiful effect. 


STEP 4


After doing some flowers was time to embellish my page. 
There used everything that came in very beautiful KIT August. 
Used these bouquets that came in this kit. 
And I also used a small clock that gave a grace on the page, I made a loop and put it close, what has become very delicate.


STEP 5


Loved the shade of blue this kit and why the same role which I did the flowers. I also did a frame. 

This frame Enhanced Photo and under that used a chipboard frame that gave a very gracious air to page.


STEP 6


And when I thought I was already finished with the page. 
I decided to put a piece of paper that matched what had already used and used a Martha Stewart punch to form another layer. 

And also put the gorgeous detail that came in this month's kit !!Make sure you stop by the Frosted Design Store for this kit and more fantastic products. Thanks for stopping by, your kind comments always make me so happy!!!!!


Thanks again!!!!!


6 Comments »

Joni is Mixing it Up!

Friday, August 22, 2014

I'm so thrilled to be back in the swing of things....I had a rather unfortunate situation that left me unable to scrap for a time.... 6 weeks to be exact!!!    My husband, myself and son were in a car accident on July 10th.  My son (he's 10) only had minor bruises (praise God!) -- and my husband had some bruises and a broken leg.  Now, somehow I got the worst of it...I had the same chest and stomach bruises from the seatbelts as my ds and dh....but I also got my legs jammed under the dashboard so I had some leg injuries and my right knee required surgery.  I also had a fracture to one of my vertebrae and a broken rib.  But the real crazy injury is that I broke BOTH HANDS (right hand required surgery).  I was holding a piece of paper in front of me when the impact occured, so we think the airbag hit my hands. But...now it's 6 weeks later and I'm doing better and have been able to scrap again (I'm calling it therapy...not only for my mind, but also for my hands!!)

Sorry for the long explanation.... today I wanted to share some layouts using our Frosted Design kits intermixed.  I love that they can so easily coordinate with each other!!

So, when the accident happened, I already had started some layouts using the July "Enchanted" kit.
These first two below also use the wood plaques from the previous "Capture the Moment" kit and are actually size 9x9 and are for a friend's baby book.

After I used part of the background paper, I wanted to use the "rest" of it on the second page, but didn't have quite enough.  So, I used a piece of blue paper in the center, and used the stencil and some paint to make the transition between the upper and lower pieces. 
Note on the Nana layout, the fairy above the flower is from the newest kit "Summer's End".


This next one was halfway done using the "Enchanted" kit, but I just couldn't figure out how to finish it up.
Then when I sat down with the "Summer's End" kit, I knew the flowers, wood & metal embellishments were the perfect final touches!!


And this last one, I started with the "Summer's End" kit but also used a few other items from the store.
I used the embossing powder from the "Enchanted" kit - it blends in with the blue mist, but it's a subtle accent.   (Thanks to my son for spritzing the mist for me..I don't quite have the hand strength to do that yet!)  I also used the Hazel and Ruby Mask Alphas (ERUPTION) and outlined the negative space with a Glaze Pen.


9 Comments »