We have no idea how this happened… it has never happened before…. but our challenge Inlinkz has been deleted!!! UGH!!!! So, for all of you that submitted fabulous work, we can't find it!! We have never had this happen before and we are sooooo sorry!!
But don't worry…. we are problem solvers!!
And here is what we have decided….
We are leaving the STRING ART CHALLENGE open two more weeks to allow those of you who already submitted (and those of you who still want to submit a project) time to do so!!
Remember…. Helmars is sponsoring this challenge so it's a prize you are going to want to win!!
To find the link to the original challenge, click HERE! You have until noon (Central Time) June 17th to link up your project!!!! We would love to see them so please link them up again!!
Showing posts with label Helmar. Show all posts
OH NOOO!! We need a re-do!!!
Tuesday, June 2, 2015
A Sweet Love Layout with Connie!
Wednesday, February 25, 2015
Hi Connie Here. I have a page to share that I created with the" Sweet Love" February Kit from Frosted Designs. I love this kit and have made several projects with it. I was inspired by a sketch from Stuck Sketches. I placed the pattern paper on black card stock. Cut out some banners with my scrap papers. added a couple doilies. I went back later and added the mask and Molding paste. I added flowers from the We are Family kit. The hearts are from the sticker sheet in the Sweet Love Kit. Did you get your kit yet? You will not be disappointed.

Details of top left

Details on right side

Details of lower left

Supplies
Martha Stewart Cherish Punch
Petaloo flowers from We are Family Kit
Picture of my Daughter Serena and her Boyfriend Skye.

Remember This with Connie!
Wednesday, January 14, 2015
Hi! Connie Here This is my first page using the January *Forever Yours* Scrapbook kit from Frosted Designs. The Kit is absolutely Gorgeous.

Details of blooms from the kit.

More Flowers and stencil from Rustic Beauty kit. I used a found item a composition notebook cover to Mat the photo.

Fussy Cutting and stencil work.

Supplies From Frosted Designs Store
Find Your Scrapping Mojo with Joni!
Tuesday, December 30, 2014
Joni Parker here today wishing you a Happy New Year!!
Ever seem to just lose your mojo? You know, your creative juices just don't seem to be flowing? I know that happens to me sometimes, so I have a few fun ways to give myself a little jump start and I thought I'd share with you today.
- I turn to challenges or sketches to see if I can get an idea going.
- I have a "list" (partially shown below) and I pick a few random numbers from each column (without looking) -- I then "try" to go along those paths, but I also don't force myself to use one of the options if it just doesn't fit. I like this idea because sometimes it reminds me of things that I might forget to use otherwise (like cork or doing a monochromatic layout)
- I also let my 11 year old son "pick" stuff for me. He loves that, and loves to walk around my scrap room and try to find items or "drawers/bins" to challenge his mommy. Sometimes he'll even pick a theme for me from column 3 on that list I mentioned above. He enjoys seeing how I used all the items he picked out for me.
Column One is "stuff", Column Two is "Manufacturers", Column Three is "Design or Topic"...but as I kept going, the list got all mixed up...whatever.

So, this layout is one of those times....I was stuck. One of my best scrappin' buddies has a favorite challenge...Pick 3 random pieces of paper (without looking) and use them together. I had my son pick the papers for me and then I turned to my list for other inspiration.
In addition to the random papers I ended up with this list: a small photo, a frame, "My Clip-it-up" (which is a carousel that houses misc embellishments), Banners/Pennants, Rulers, Cork and Metal. Sounds like a lot, but remember, I know I can take "off" something if it doesn't seem to work.
I went to work with my papers and photo first, getting a basic design down. Then I grabbed several of my Frosted Design kits and found some of the embellishments and a lot more than even my list.

So, hope that you can find your mojo when you seem to lose it. I also will sometimes go to Pinterest or Magazines to get a little inspiration!!
Hope you have a great 2015!!
 Also used but not pictured below: Rustic Beauty Kit & Fancy Pants Nautical Tickets
 |  |  |  |  |
 |
A Vintage Mini with Connie!
Monday, December 29, 2014
Happy Holidays! Connie here and it's my turn on the Frosted Designs blog. I hope everyone is enjoying their holiday season. My home is chaotic just the way I like it. I have a mini album to share with you today. I used a house shape chipboard a 6x6 paper pad from Frosted Designs store and doilies and lace from my stash.
Here is the album Standing
I added vintage images for this mini.

Page 1 and 2 Framed photo and waterfall pages

Page 3 and 4 Framed photo and Mini book pages

Page 5 and 6 Pocket with tag and mini fold album pages

Inside of page 6

Back cover Matted images

Front cover lying flat

I had so much fun creating this album. I have switched out the pictures several times and really like the vintage images. The bonus is that I can still add pictures of my kids. Thanks for looking and I would like to wish everyone a Happy New Year.
Supplies used from Frosted Designs Store.
Rummage & Ransack with Tamiko
Sunday, November 2, 2014
Hi everyone.. Tamiko here! I live right outside Chicago, Illinois and we saw snow flurries several times just yesterday! Fall is more than here! I needed a coat and hat when I scurried to the grocery store this morning. That says one thing to me! I better get use to being INSIDE the house more than OUTSIDE, pretty soon.
I picked up my pocket scavenger and browsed through some pages. I love to get my family and friends involved in what I do, just as I like to be included in their various ventures. Some friends gave me the scavenge items and alterations for the following pages. I spent time indoors using supplies I would have never just thought on my own to put together. It was fun & I had a ball!
My first page came from Scavenged item: #71 UPC code; My alterations were: #59 to add music and #167 go away for 5 minutes, then come back and doodle!
 I added multiple UPC codes that I cut from various packages to the page along the border, made the image from music papers, and doodled and slightly masked the UPC codes.. very fun. Doodles were done with my Signo Unibal gel pen..
My second page came from Scavenged item: #33 a rock tracing. My alterations came from #98 connect this item to something you love and #127 let the your gut tell you what to do... (sounds like a free pass to play to me!!)
 My second page was a tracing of a rock from outside ::giggles:: At first when I saw the rock, I saw a heart.. then as I looked further I saw a coffee cup (could have been the fact that I needed coffee.. smiles). My gut told me to use my oil pastels and create a colorful background, so I did. Any page with coffee is ok with me.
My third page came from Scavenged item: #53 something left by an animal; My alterations are #167 to frame it and #3 to alter the edges.
 My second page I decided to do cat paws.. and I honestly should have chosen doggy paws.. Since I am more of a dog person.. (smile) I framed it with washi tape and altered the edges by stenciling a few paint colors. I also left the words.. Cats leave paw prints.. in my driveway! ::giggle:: because they do! Must be a few strays in the neighborhood.. or some nosey neighbor's cat always leaving paw prints in the drive..
These pages don't have to be hard. They are fun and outside of investing in the Rummage and Ransack Kit.. you really can make numerous games with different ages and create awesome pages.
Have a great week all!! :)

You can pick up your kit HERE!
 | |
Rummage & Ransack with Tamiko
Sunday, October 19, 2014
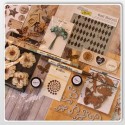
Howdy folks! It's Tamiko on the blog today and I am playing with the new KIT!
.jpg)
When I first saw this kit, I automatically thought, it looks like a travel on the go kit. Everything fits in a small bag and you can.. literally.. get up and go and have a small adventure.
The book contains a list in the back which I copied and began scavenging my stash. I found a lot of things right away and secured then inside my book on the pages with Washi Tape. lol I even used washi tape as one of my items. My book is thick and I don't mind!! I like BIG BOOKs. ::giggles::
I decided when I use the book, I would have 1 scavenger item and at least 2 alterations. I even made a game of it and let others choose my items to create a page with.
This week I let Sandee Setliff choose. For my first page
She gave me Scanvenge item #10 - a napkin
Alterations #129 add colored paper and #150 to combine

So I took the napkin I had already taped to my page, used only the first layer and used some matte medium to adhere it to the page, then I used my gelatos to *combine and extend the size of the napkin to a full page. I added the color paper as a boarder and and doodled with a white Signo gel pen. Page is done and I have art in my book!
She also gave me a second page..
I got scavenged item #12- a post it note! (yikes)
Alterations -Make it a building (house) from one of the intro pages and #86 write and ode to this item (waves fist in air.. OH NO!! write???)

I created a background for my page with gesso and 3 acrylic paints. I cut my post-it to the shape of a small house. Believe it or not these items were already doodled on the post-it. (smiles) I then glued it to my page with Helmars 450. Wrote my version of an ode with the Identipen (included in the kit) and framed it; added some shading to the house with my charcoal pencil from the kit; and topped it all with some Signo white pen doodles. Page is Done! More artwork in my book!
My ode reads:
to the tune of ABC song
M.Y.H.O.U.S.E
Filled with love and chocolate things
Coffee and small pastry bites
Craft filled table with delights
Music blasting in my ears,
Drowns out all the noise my dears.
M.Y.H.O.U.S.E
how special and perfect you are to me
It's not long.. but neither is my page! (laughs)
I think the hardest thing for me is to decide to commit to the items I have pre-chose and selected to include on my page. The whole thing has been fun and will continue to be fun. There are over 70 items to scavenge and about 180 alterations! Who could go bored with that?
Anyway, that's it for me today!
If you have any questions, don't hesitate to ask.. or post then in the Frosted Designs page!
Have a great week!!
You can pick up your kit HERE!
| |
Turning Trash to Treasure with Joni!
Friday, October 3, 2014
Hi everyone...Joni here today sharing a fun colorful layout that I did after I found myself sitting at my scrapbook table frustrated with my son for leaving his "trash" on my table.

Does everyone know what a SPIROGRAPH is?
It's a "kids" toy from "way back".... that uses plastic circles with holes in them to create really cool designs. They are still popular today and my son got one recently as a gift.

So after my son makes one (they usually end up circular) -- he uses my circle cutter, which is in my scrapbook room of course, to cut out his design before adding to his collection. This means that the leftover paper ends up sitting on my scrapbook table. Funny how he puts away the circle cutter, but not the excess paper.
So, as I sat down one day...I saw his "trash" and had an idea to use the different sizes of circles left in his paper as templates....
On this first one, you can even see the larger spirograph design that he didn't cut out.
I used my Gelatos to draw a yellow circle just inside the cut-out circle.

Then I did the same thing with blue using a larger circle.

Then I used my finger to swipe from the "outline" and push the color "in" towards the center.

This is how it looked when I was done.

I added lots of Washi Tapes and tickets from the Fancy Pants Nautical line to add color to the layout.
Thanks for letting me share with you today!
Here is the layout again.
5 Comments »