
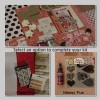
Hey there my fellow crafters!!! It's Brandi and I'm back again with all kinds of January kit goodness!!! I've had soooo much fun playing with this one... Seriously!!! The papers, embellies, and die-cuts are just so "lovable"!!! I was able to create several projects with just one kit and am here to share a few of them with you today :-)
"Love is in the Air"
First on the list is a layout I created using a picture of me and my hubby at a wedding a few years back. Here's a look at the completed page:

Yes, I did the unthinkable and cut up that beautiful Amy Tangerine die-cut page!!! I really only wanted the letters here and will use the "scrap" as a mask on a future project!!!

As I said before, one of my FAV things to do is outline things with Sharpie markers. Well, there is no lack of that on this one!!! I used a bronze metallic sharpie and outlined several pieces, including the "Love" letters, and used distress ink on the rest. I also added pop-dots under the "O" in love to create a little dimension:

For the rest of the title, I used the sticker letters by Teresa Collins and DIY Thickers. These are wonderful because you can do so many different things!!! I used a pink gelato to add some soft color, then sprinkled the Tim Holtz "Rock Candy" Distress Glitter for some glitz!!

I also used a small heart punch and scraps I had lying around from the kit to create the "flying" hearts at the top of the page. I used the sharpie to outline them and scored them down the middle. Here's a closer look:

I finished the page with some added journaling. I do most of my journaling behind the scenes (usually on a journal card on the back of the page), but decided to make a journal pocket for this layout. I used one of the journaling cards included in the die-cuts and added a tab to the top. After creating the pocket, the card slides nicely in and all you see is the tab :-)


"You Are My Happy"
The next layout I created has turned out to be one of my favorite layouts!!! I knew I wanted to create something soft, elegant, and pretty. Nothing says "pretty" like a whole lot of pink!!! Here's the page:

This one was an awesome page to make with all sorts of FD Store goodies!!! I started by using a pink gelato and a mini-mister to create a soft edge around the whole page. I put my page through my Cricut Expression 2 to cut out some hearts at the bottom, outlining them also with the gelato.
I took some doilies from my stash and laid them down to create a banner at the top. I added my photos to a couple of Pink Paislee "Colorwash" tags, using the pink gelato and mister to add color. I also took the Jillibean "Flash Cards" from the January kit and made them into tags. I matted all the tags with Pink Paislee "Colorwash" pattern papers and brushed the pink gelato around the edges. I finished my banner with some eyelets and the sheer ribbon from the January kit.

I took out the heart stencil from the January "Get Messy" kit and some Golden Molding Paste to make the heart in the center. I cut up tiny pieces of the gelato to tint the molding paste, and added the Tim Holtz "Rock Candy" distress glitter for additional texture and shine!!!

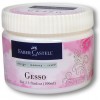
Using the same technique, only with gesso this time, I used my fingers to spread some all over the Prima "Paquita" flower in the bottom corner and the chipboard word "Happy" in my title.

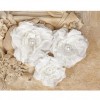
I finished the page with Maya Road Resin Flowers... These are soooo beautiful!!! You can literally let them fall to your page (or project) and glue them where they land!!!

P.S. I was very lucky to submit this to the LGS "Sketch Inspired" magazine and it made cover!!!! YAY :-)
"With Love"
Okay... This is my last project of the day... I swear!!!! I wanted to make a card with this kit as well to show how versatile it can be!!! I used Card Sketch #19 over at Sketch N Scrap as a starting point.
Here's the card:

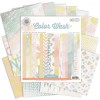
Aren't these papers just beautiful?!? I LOVE them!!!
This card was pretty easy to make as I pulled almost everything from the January kit. I used distress ink around the edges of the papers and paper doily. I added the DIY Thickers (the number 14) to the center and used more of the "Tim Holtz "Rock Candy" distress glitter to the top. I also added liquid pearls around the center of the doily for added bling :-)

I stamped my sentiment on kraft paper and cut it out in banner shape. I used a white Sakura Gelly Roll pen to create the "faux" stitched look!!!

I finished the card with chevron chipboard by UmWow Studios and flowers from the kit!!!

Whew.... Sorry to keep you so long!!! I hope you enjoyed my projects!!!
Have a LUCKY day :-)
Products from the Frosted Designs Store:
5 Comments »


5 Responses to “"Love-ing" the January Kit with Brandi!”
Wow!! Such stunning projects! LOVE the cloud of hearts on the layout! You are my Happy is simply amazinging! Gorgeous use of the kit!
Wow!! Such stunning projects! LOVE the cloud of hearts on the layout! You are my Happy is simply amazinging! Gorgeous use of the kit!
Wow wow wow wow wowwwwwwwww!! These are GORGEOUS!!!!! I am loving all the hearts!!!!
These are absolutely gorgeous! Wonderful little details in each project.
Thanks ladies!!! I had a blast using this kit!!!
Post a Comment