Archive for April 2013

Tuesday Tutorial with Deena!

Tuesday, April 30, 2013

I would like to share with you how to use a product called Mask It. It comes from X-Press It, it is a low tack film that provides you with many possibilities

Mask It
Tools Required:
Mask It
Sharpe Blade
Ink
2 different stamps
Heat Gun
Card Stock

When choosing the stamps start with one that that has an easy shape to cut around and the second stamp as a background. To begin first stamp the shape that you want to mask. For quick drying use the heat gun. ce


Once image is dry cut a piece of the Mask-It that will completely cover the stamped image, you dont need any excess as you are going to cut away the film and just leave it on the image.


When cutting the film, dont press to hard as you want to cut the film only and not the card underneath, which is why I suggested you use a simple shape to get the feel for it. Make sure that your blade is sharp if need be put in a brand new blade, will make it just that little bit easier as you dont have to press as hard.

Once you have finished cutting the film, carefully remove the Mask-It that is not covering the stamped image. Do it slowly just in case you have not cut all the way through, this allows you to carefully recut the film in the right spot.


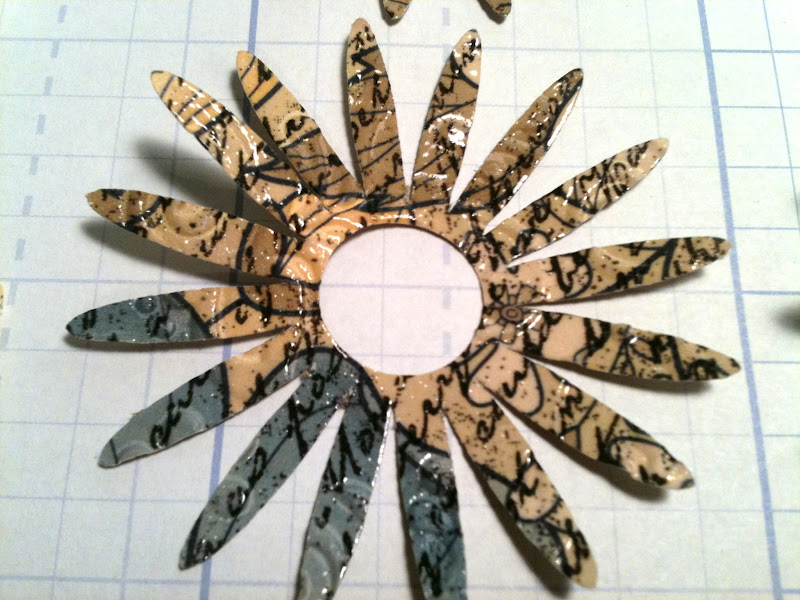
Now that excess film has been removed ink up your second stamp and stamp over the top of your first image.


 After you have stamped your second image it is time to remove the film that is covering your image.


Mask-It can be used in many ways, create your own shape and use it as a stencil, stamp an image and then colour the card around it. Before putting the Mask It over the first stamped image colour it in.

Hope that this tutorial has sparked your imagination, Happy Creating.

1 Comment »

Friday Inspiration - Sketch + Doilies!

Friday, April 26, 2013


1 Comment »

Fabulous Friday Challenge - Sketch + Doilies!

We have a special treat for you this week! Not only are we challenging you to use up those doilies that you already have  in your crafting stash, but we would also like to see you use our sketch!


Our very own Design Team Member Brenshevia designed this sketch! You can use it to make a card, layout or off the page project! Our design team has done an fabulous job of making projects that demonstrate all the different ways you can adapt this sketch to various projects, not just scrapbook layouts! Be sure to stop by each day for more inspiration! And, by playing along with us, you could win this prize....

Vintage Street Market


Please stop by this sponsors blog for some fantastic inspiration and ephemera ideas

A little more about this weeks sponsor

Make the wrapping part of the gift! Enhance a thoughtful gift by wrapping it in our high quality, vintage-inspired, Paper Sheets. Take it one step further, and create a tag or card (or the gift itself!) using a variety of the paper textures each package includes. Further embellish your creation with the coordinating Tags & Things. The recipient of your gift will be sure to appreciate the attention to detail, and will truly treasure the feelings your gift evokes.
Formed by two families, Vintage Street Market celebrates memories, and the textures, sentiments and simplicity from times past. It is our intention to not only offer exceptional products and superior customer service, but to also create a community where nostalgia can be shared, creativity explored, and memories preserved.
Vintage Street Market, Inc. is a company founded and created by friends and families. Michelle Jackson and Allison Rittner have been in the craft goods and scrapbooking industry for many years, each with their own diverse background and business experience. They have combined their individual skills along with their similar tastes and styles to create products with a vintage flair. Great effort has been made to design, develop and distribute a quality product while practicing excellent customer service and respect for their customers.

1 Comment »

Fabulous Friday Top 3 & Winner!

Thursday, April 25, 2013


It's Thursday and that means it is time to announce 
the Top 3 and winner of our Travel Challenge!
Thanks to all of you who played along!
Here are the Top 3 as picked by our design team:


Congrats ladies!  
If you would like a Top 3 blinkie for your blog please
email Debbie at frosteddesigns@ymail.com. 
Please put FD Top 3 in your subject line.

We would like to thank Artsy Albums
 

for sponsoring our challenge with
 this mini travel album kit:


The winner is
Stacia Brandt

Congrats Stacia!
Please email Debbie at frosteddesigns@ymail.com with your mailing information.  
Please put FD Winner in your subject line.
You have 7 days to claim your prize.

Don't forget to check back tomorrow 
for a new Fabulous Friday Challenge and some 
amazing inspiration from our design team!

3 Comments »

Tutorial Tuesday with Tamra!

Tuesday, April 23, 2013


Flower Power!


 There's just something about flowers...and I can't get enough of them.
 
Using the Cricut Art Philosophy cartridge exclusive to Close To My Heart you can create these flowers in about 10 minutes.
I'm so passionate about flowers, I like to incorporate them into everything I do and bringing them to life on paper.  I used 2 images from page 21 of the Cricut Art Philosophy book.  Cutting the Decorative Layer Flower (shift key is used for this image) out with Butter Cup cardstock at 2.5 inches and 1.5 inches. 
Next, using Pemberly paper packet (retired from CTMH), cut the "Layer" image (again using the shift key) with an assortment of the patterned paper at 2.5, 2.25 and 1.25 inches.
Then comes the dimension.....step one....emboss the cut pieces in your favorite embossing folder.
Having all these different textures on the flowers really makes your project pop.
and for even more dimension.....stamp the cut pieces with a background stamp with black or coca ink.  I used the word stamp from the set Universal Backgrounds (CTMH D1477)....awesome, but wait you're just getting started.
lovin' it!
and for more of an effect.......
emboss each flower piece with versa mark and clear embossing powder Z821.  On a clear block take the clear background stamp...flip it over so you can coat the back of the stamp in versa mark then stamping the flowers and covering them with clear embossing powder...heat accordingly.   It works great! 
Can you see that shine....it also gives you the ability
to shape the petals better.
Now, I'm making 4 flowers so you would only need one of each size to make one flower.

Isn't this amazing how the clear emboss brings the color to life on the paper?
Now you're ready to curl the petals.....notice how I cut between each petal here?
Layer the pieces...starting with the largest petal on the bottom...as you assemble the flower add more dimension by curling each layer.
Fluff each flower when done........add some bling to the center...and
your flowers are complete....
Thanks for stopping by....and stay inky my friends :)


5 Comments »