
It starts with this..
 |
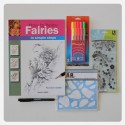
| The first, strictly mixed media kit that you can find here and FROSTED DESIGNS. |
 |
| Nice SUNNY day! :) Along with the contents of the mixed media kit, I gathered some of my supplies and went outside.. I began first by taking my Ranger Dylusions Creative Journal, three of my Dylusions Sprays, a Sakura Sensei Pen (03) and my mechanical pencil and eraser, a little DecoArt Gesso and a makeup sponge.. |
 |
| I began by spray my journal pages with my Dylusions Sprays. I let the run together and soak the page. Then I blotted lightly puddles with a baby wipe. |
 |
| There were some splashes I didn't care for on the page, so what did I do? I put gesso on it! (chuckles) I rubbed a little from my fingertip on the page.. looks like clouds if you ask me! HA!! We'll see how that works later! Then I decided to see how my moonlight gel pens looked against the inks!! Oh these ANYONE will love! Key to using them? Come close to the screen, because I have to whisper... ::whispering::: light hand keeps the flow.. dry surface is a must.. when in doubt, wipe the debris off the tip.. and try it again! (smiles) |
 |
| Then I took my stencil and lightly pounced a little gesso through it, with the makeup applicator. Guess what? The stencil says STONES.. They look like perfectly imperfect mushroom caps to me! |
Now that we have a little background started.. Lets get a little FAIRY MAGIC going!! ::sprinkling glitter over my shoulder for good luck::
 |
| Every body image begins with basic shapes.. YOU decide which ones are the easiest, then knock those out! then you can take your time and focus on areas you need the most help with. Remember.. just practice.. keep practicing... Here, the circles represent jointed areas on the upper body.. My diagram won't look like the book.. Well, because I didn't write the book (smile). Draw loosely, make mistakes.. it erases!! |
 |
| Picture explains it .. (haha) I wanted YOU and ME to know, I wanted BIGGER wings on my big body fairy! I added a kinda donut shape to the waist and some legs. My next image will give you a slightly better picture of the lower half. |
 |
| I started adding details to my image, but I did it with my Sakura Sensei 03 (thin lines but not too fine) I also retraced over my image. I took my time. These will be my final lines on my image and I would like then as neat as my hand will allow. I'm not looking for perfect. I am looking for recognizable.. (smile) |
 |
| This is my semi-complete image with my Sakura write-over. I apologize for not knowing certain *terminology*, but I hope you are following along with me well :) Make sure you let the ink dry! (just a few seconds) |
 |
| Everyone who wants to draw.. needs good eraser.. I mean a SEPARATE eraser from your pencil. They tend to work well and take up little to no space! There is a great one that came with my Sakura Sensei pens and/pencil set! I love it! Ok.. this is where you ERASE ALL the PENCIL lines!! OMGosh, why didn't I do this when I was a kid? do you know how many times I drew.. with a pen.. because I was suppose to, when I made comics? How many times I would have drawn MORE had I thought.. or someone shared.. do it it pencil.. then do a write over and erase? |
 |
| one more full image.. anyone notice.. I didn't do the hands? (laughs out loudly.. even as I type this) I hate hands.. It's my least favorite part.. plus I am not sure exactly how I want the hands.. Didn't want it to deter me from the idea I had come with for my post.. So I am going to keep going.. (smiles) |
I won't bore you with bore you with pictures of me fussy cutting and coloring my fairy, which I should have scanned ::big whoops:: would have been cool to use it later!! I painted with a bunch of the colors I used in the background, I dipped my brush in some DecoArt Multi-Surface Satin Acrylics in Cotton ball (white) and added to various Dylusions ink sprays for color (I wanted an opaque color, that didn't move, when I added my stickles/glitter). Then I also used my DecoArt Acrylics in lipstick, flamingo pink, chocolate, pumpkin.. to add colors to my fairy and my mushrooms. I used Helmar 450 to secure my image.
Anywayyy.. Here is my finished page.. :)
 |
| ALL you NEED is FAiTH, TRUST and little bit of PIXiE DUST!! Don't I know that to be true!! |
 |
| What kind of Fairy wiuld she be if she didn't have any glitter?? so I used some Stickles to add glitter to my fairy's wings, tutu, wand and eyeshadow. |
 |
| Then I took my white china pencil and made some highlights on my lettering and mushrooms |
 |
I added my hands!!I painted them in.. Then took my stabilo pencil in brown and added details her skin tone.. (works for me!!) Then I also took the flourishes stamp from the kit and I stamped all over the background with archival ink. I also took the moonlight gel pens and added some centers to many of the flowers. |
 |
| Just another angle of more flourishes that got a little pixie dust loving from my fairy! |
Hope you enjoyed my Tutorial and Thank YOU for stopping by and looking!!
Have a WONDERFUL rest of the WEEK!!
15 Comments »


15 Responses to “Moonlit Dreams - Pixie Dust is a MUST!”
I LOVE this, using the stone stencil as mushroom caps was genius! She is a fabulous fairy!!
WOW!!!! I love your fairy and the colors are so vibrant.
So Cool!!! You are a riot! I laughed as I read this!
Love your fairy great idea and wonderful art work!
LOL, you make me laugh so hard all the time and I love it. I also LOVE your page!!!! I absolutely love the background and what an awesome fairy you made also. (get some tracing paper and trace it, then make a copy). Can't wait til you do another tutorial, I always need the laughs and to look at beautiful art!!
Its hard to believe this is your first tutorial, Miss Entertainment! This looks like a fabulous kit and after seeing your work, I bet many would buy it just cuz of your stinkin" cute fairy. You had me laughing all the way through this ( you're quite the writer, btw) and then it ended with a big smile on my face at seeing your finished piece. I look forward to seeing more of your stuff. You go girlie!
I am still smiling... Think some of that fairy dust just scattered through the wave lengths and out to the people who are on this end.... Love your fairy and the background is super nice...
Just waiting for tutorial #2
Ohhhhhhhhh I love love love love this!!!! That FAIRY is FABULOUS!!!!!
I think you did a great job. I liked the mushroom idea too. I would never have thought of the circles. This would have been great to know as a kid. We might have all been better at drawing people if we did.
Your fairy is wonderful look at all the wonderful sparkle and glitter just perfect.. Love the way you explained it all made it very easy to follow.. Fantastic finished result you achieved. I am sure you would still be able to scan and use her again in something else..
Love her to bits..
Sandy :)
wondermous!
*Melody*
Beautiful work and a wonderful tutorial!
Amazing project!!! Thank you for the tips!
Absolutely gorgeous, you did a wonderful job!
Totally fabulous project. Fantastic tutorial Tamiko1 WTG!!!!
Post a Comment