

I wanted to show you a couple different things with this kit. I really like the tags that are included. They are great to just use as they are or to mist/ink them up.

Many of my mists are still packed from our move, but I managed to find these. Any mists would do. The Dylusions Inks would give it a nice darker color.

I started by using one color and then right after I added two other colors. Applying them while it is still damp allows the colors to blend together just a bit.


For this tag, I decided to put it on a piece of Pink Paislee paper that comes in the kit. I had in mind to cut the "tag" from the paper and use it. I didn't notice until I was done with the misting that one "arm" of the E was tucked under and so it didn't look like an E on the paper. Whoops! Lesson learned to make sure you check the tag first before misting. :)


Here are both tags misted up with about three different colors. I really like the way these tags hold the color and really make the letters pop.
I thought I would show you how I usually put together a layout. I'm sure there are many of you out there that have developed your own way as I have myself. But I am always interested in seeing how someone else thinks. :)

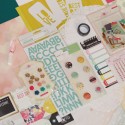
I start by gathering everything I think I'm going to use on my layout. Papers, photos, embellishments that are all from the November Scrapbooking Kit. This kit is PACKED with fun things.

Next, I begin laying it out. I originally thought I would use the yellow paper as my background and decided to use the white paper instead. I wanted my photo to pop a little more and thought the white was a better choice.

Then I decided that my page needed a bit of mist on it. So gold mist it was to mimic the gold Aspen leaves.

Next, I just begin laying things out where I think they will go. Nothing is taped down at this point because then I can move things around as needed. When I become sure things are in place where I want them to be, I will tape them down with double sided tape.

I cut off the top of my misted tag so I could include it on two spots on my layout. I have cut a couple tags and words from one of the 12x12 papers. I just love papers that have extras like that where you can use them as a whole or cut apart.

I put the tag "best day" on on of the dark colored tags so the words would show up better. In the end, I wanted to change it to a different piece of paper but it was already on. So I made it work and ended up liking the way it looked.

Did I mention how much I love all the embellishments with this kit? I love the flair and the resin flowers along with all the tags and goodies that came with the embellishments. The dollies are awesome too! All sizes!!

Here is my finished layout. As I said, I'm sure you all have your own way of putting layouts together but I hope this gives you an inside look at how my creative thinking works. For anyone just starting out or finding your own way, my advice to you would be just go with what feels right. Push things around until they look the way you like. I usually start out with more things on my table than what actually end up on my layout. There are also times that I will look at a layout when its done or almost done and think something is missing and add just one more thing. :)

Make sure you stop on by the Frosted Designs store to purchase this kit and other great products. From now until November 10, anyone who purchases a November Scrapbooking kit and mentions my name "Lydia" will receive a special gift just from me! I will send you a package of any wood veneer of your choice ($3.99 or less). Just make sure you tell Barb that I sent you!
Thanks for stopping by today!
Lydia
4 Comments »


4 Responses to “Family Blessings - A Tutorial by Lydia!”
So pretty!
Beautiful! LOVING all that misting!!!!
Love the way you used the spray ink to mist the tags! They are so much fun to play with!
barb :)
Cute! Thanks for the step by step how to:) Your layout is super cute!
Peace, Love, & Cricut Hugs!
Monica L.
Post a Comment